Feeds:
Posts
Comments

Posts Tagged ‘TSD’

Recently I was doing some shopping in my local outdoor store, Andy Thornal Company. I was picking up a few last minute items for a weekend camping trip. Slowly I made my way to the cash register, like a kid being forced to come inside by his parents as the street lights came on. I causally lingered past the glass cases where knives and various coveted outdoor paraphernalia resided. The man behind the counter like always asked if there was anything in particular i would like to see. I gently replied no when almost suddenly something caught my eye. It was a small blaze orange knife. I quickly remembered seeing something similar on an outdoor television program and asked, “Is that one of those surgical type skinning knives?” The salesman piped up and informed that what I was describing was the Havalon Piranta! He then went on to pull it out of the display and to my surprise I was instantly impressed with the knife as I began to handle it.

The Piranta was very lightweight, immediately I thought of the backcountry. It had a very nice feel, even for a guy with a larger hand it was easy to maneuver. It was razor sharp, actually surgical steel sharp and it came with 12 replacement blades. Again I thought of the back country and how I wasn’t going to need to pack a heavy sharpening stone up the mountain anymore. Lastly and to my surprise was the reasonable price tag. It was retailing at Thornal’s for $39.99. This value made it even easier to stomach for if I lost it during any excursion it wouldn’t be near as heart breaking as fumbling my $150.00 Benchmade. Needless to say it didn’t take much convincing for me to throw it onto the pile of other items at the check out. As I left the store I couldn’t stop thinking about the first animal I could try my new Havalon on!

Like to be expected the Havalon performed remarkable during its first outing. I was fortunate to be able to use it to skin a decent Florida boar hog. It was super sharp and zipped through the hide with remarkable ease. My next initial thought was that it wouldn’t be able to hold its edge for very long, definitely not through this entire hog. As I kept cutting I actually forgot that the blade was replaceable and or that it needed to be replaced. Quickly the job was finished…Wow, a whole hog on one blade, that is awesome! As I began to clean up, I decided to replace the blade before packing the Piranta away…and thats where I hit a speed bump. I figured it would be easy to figure out how to remove the old blade but as I pulled and pushed I was stumped. Cautiously I proceeded because the blade was still mildly sharp and I didn’t want to lose a digit in the process. Then I remembered I had the original box in the truck. It had a very simple diagram explaining blade removal and installation and voila, off with the old and in with the new. I should have read through the directions initially thats for sure but I was way to excited and skipped that step.

Since that outing Team Southern Draw has teamed up with Havalon exclusively. All of us team members are equipped with these knives and plan to use them in all game cleaning and processing not only because of the relationship but more importantly these knives and this company rock. They have a great product of high quality and the customer service is second to none. Do yourself a favor and pick up a Havalon, for the value you will not be disappointed. Just be sure to breeze through the instructions.

Pictures to come!

Adam | TSD |

Read Full Post »

*By popular demand we have reposted the “Bow Press” post.  We still get emails about this one…..an amazing project, enjoy!

I don’t know about you, but I’m tired of having to rely on other people when it comes to tinkering with my bow. What if I want to change my own draw string? What if I simply want to adjust my peep sight? Those tasks mean a drive to the local archery shop is in my very near future. Wouldn’t it be great if I had a bow press of my own….?

Christmas was just around the corner, and every year my brother Adam and I love to get each other cool hunting gifts. So, I’m in the gym on a normal Monday trying to think of something rugged that I could get him, and it hit me, “I’m going to buy him a bow press”! Wait, better yet, “I am going to build him one”! Yep, that is exactly what I am going to do.

So my vision began with a get together with my buddy John, who is an excellent welder and an even better artist, to talk about my idea. As I’m blowing him up with this vision I noticed that he too was starting to get excited. Our shared enthusiasm was awesome, especially since we both had never done anything like this before. Excitement turned into brainstorming. We began throwing around ideas, doing research on Archery Talk and using Google images like a road map. The next thing I know, I’m ordering square metal tubing, an acme rod and a bunch of other materials to bring this vision to life.

First we had to fabricate the frame. This part was a piece of cake. We used 2 inch square tubing for the majority of the frame and 1 3\4 inch square tubing for the pressing arm. To create the pressing action, we ran a ¾ inch acme rod through the center of the tubing which threaded into a ¾ inch matching acme nut that was welded 3 inches the pressing arm. It was extremely critical that the nut was perfectly aligned with the acme rod to prevent any binding that may occur while the press opened and closed. This part of the build consisted of a little, “trial and error”, which definitely added some stress.

2" Square Tubing Frame

2″ Square Tubing Frame

Acme Rod & Flange Bearing

3/4″ Acme Rod & Flange Bearing

3/4" Acme Nut

3/4″ Acme Nut

The next step in the construction, and in my opinion, one of the most interesting, was using Adobe Illustrator to design the press’s fingers. The fingers are the portion of the press that would be used to hold the bow in place. Once the design was finished we then transferred the file to a flash drive and took it to a local machine shop. There they cut the fingers out of ½ inch aluminum on a water jet. It was amazing to see how we were able to transform my design on paper, into actual parts.

Inputing Into Water Jet

Inputing Info into Water Jet

Finished Fingers

Finished Fingers

After close to a month’s time and 40 hours of fabrication, things were finally coming together and the masterpiece was nearly complete. It took a little bit longer than expected due to all of the trial and error, and it probably didn’t help that I wouldn’t give the “ok”, to a piece that wasn’t perfect. John repeatedly joked about how much of a perfectionist I was the entire time, this coming from a man who gets paid for his extreme attention to detail. What’s that say about me? Ha-ha.

Pressing Arm Adjuster

Pressing Arm Adjuster

Finished Product!!

Finished Product!!

I feel like a gained so much knowledge from this little garage project. I encourage anyone interested in building their own press to do it! If anyone has any questions, I would be happy to provide a materials list, more pictures as well as a few recommendations.

By the way, my brother Adam loved it. He was totally speachless!

Sam | TSD

Read Full Post »

We are headed to St. Vincent Island…AGAIN!  I still can’t believe this happened!  For the 2nd year in a row the Southern Draw crew has been drawn to participate in one of Florida’s most coveted hunting experiences on St. Vincent National Wildlife Refuge.  We are gearing up and setting out to try our luck at tagging a Sambar Deer.  But first let me explain how this happened two years in a row…..  The “old” Florida Wildlife Commission’s lottery system rules stated; that once drawn for this quota hunt, each participant is ineligible to apply for the hunt the following year.  However this year the FWC rules changed, implementing a preference point system for this quota hunt.  The “new” rule change stated; that all said applicants are eligible to apply; those not awarded a tag will be issued a preference point to use for future applications.  What that translates into…..all applicants started back at square one this year, all applicants will have a chance one day to draw because of the points system and that the TSD crew happens to be some lucky SOB’s. 

St Vincent 2013

If all of this seems foreign to you or you are just unfamiliar with this hunt altogether then please check out our blog post from last year.  It does a better job of explaining how the hunt actually takes place.  If there are any hunters out there that drew this tag and are having hard times finding information about this hunt, please don’t hesitate to shoot us a message with questions.  We’d be happy to fill you in with any information we can, our best advice would be to do your research before leaving for this hunt.

In addition, any hunters who do not have personal watercraft and need to find a way to-and-from the island, charter boats are the way to go.  They typically charge a rate of $100/per person/round trip.  The charter we used last year was excellent and highly recommended.  Reel Memories Charters out of Apalachicola, FL Contact: Pam (850) 653-9322.  They were on time, super friendly, provided a huge boat that fit all five hunters comfortably,  were capable of hauling 2x the gear than what we traveled with and even gave us pointers on how to hunt the island.  Experience the travels and excitement first hand by checking out our 2012 Sambar Short Film that we put together following last years trip.   Watch it, like it and share it with friends! 

Shoot your bows or muzzle loaders for this one!!

Adam | TSD |

Read Full Post »

Alright, so in my last post I briefly told you guys that I constructed a few feeders this summer.  Well we all know how much of a pain it is to fill up 55 gallon feeders when you are by yourself and bringing the ladder has been forgotten “AGAIN”, for the fourth time in a row.  I’m not talking about filling the nice, convenient, suspended, feeder you hung in the 50 year old oak tree with a cable and pulley system that’s controlled with a fancy boat winch either…..Sometimes you don’t have that option.  My point is that a ladder is necessary in filling what seems like a bottomless barrel with those bags of golden nuggets 50 pounds at a time.  But is still calls for one extra trip to carry the ladder in!  Then it came to me!! “Why don’t I build a feeder with a climbing system permanently integrated into the feeder itself”?

The concept seemed simple enough. So I set my mind to see this project through.  (By the way if you don’t mind doing a little work, building your own feeder is the cheapest way to go.)  Let me preface this “How-To”, by saying that this project requires some welding.  If you don’t own a welder, and want to learn how to weld, I would encourage you to go down to your local Home Depot and purchase a Lincoln arc welder.  It’s a great machine to learn on because it’s easy to use.  They cost about $300 and trust me once you own one you will find a million uses for it.

The Build – To start out, you need to find a 55 gallon drum.  Make sure you find one with a weather tight lid.  There are a few different kinds, one has a screw on lid with a rubber gasket, and the other has a metal ring clamp to hold the lid tight.  Either will do.  You can typically find them at feed stores for $10 to $15.  Next you must determine what type of spinner install.  Our favorite is the Moultrie Pro Hunter.  It can be purchased at Bass Pro Shops for around $50.  I will go into more detail about this gem in a near future “Gear Review”.  Once you affix the spinner to the barrel (following the directions in the box) you are ready for the fun part!

Feeder Ladder 2

This is where you get to be a little creative.  Determine how tall you want your feeder to be.  We like for the bottom of our spinners to be at least 5’ off the ground.  This will help deter raccoons from ravaging the guts out of your spinner and also provides clearance for deer to walk underneath it.  You have a few different options on attaching the legs to the barrel.  You can either bolt them directly to the barrel or do what I did and construct a bracket for the legs to go into.  The bracket method will allow the legs to be easily removed for transport.  The brackets are made out of some scrap 1/8” thick diamond plate or similar and 1” square tubing.  Next I cut a section of the 1” square tubing to 12” long.  Then 3” from one end I began heating the tubing with a torch and bent it to about a 30 degree angle.  I then welded the bent tubing to the diamond plate.  Once cooled I drilled 5/16” holes in all four corners of the diamond plate to allow the bracket to be bolted to the barrel.  RECOMMENDATION: BOLT THE BRACKETS TOWARDS THE BOTTOM OF THE BARREL.  THE BOTTOM IF THE BARREL IS THE THICKEST PART OF THE PLASTIC.  Next, cut your legs to the appropriate length, you should use 1-1/4” square tubing for the legs.  This will allow the legs to slide snugly over the 1” tubing on your bracket. Now designate one of your 3 legs to be the ladder.  Cut three pieces of 1-1/4” tubing each at 12”. Weld the 12” pieces perpendicular onto the designated leg.  Be sure to space evenly, usually about 18” apart is pretty comfortable.  Once it is all welded, give her an ole fashioned backyard camo paint job and she is ready for the woods!!

Ladder Feeder

Hopefully you all will find this DIY easy to tackle.  It’s a great way to simplify those last minute trips to the lease.  Plus it’s a great excuse to get outside and away from the ole lady.  If you guys have any questions feel free to email me at brock@teamsoutherndraw.com

Brock | TSD


Read Full Post »

Well…..I know it’s been a while since our last blog post and much has happened since then!  Since our Trip to St. Vincent Island last November the guys have made leaps and bounds to improve not only ourselves but also to improve our work for our followers.  I’m sure many of you have noticed but our website has a completely new look.  The main reasons for changing the website was to make it:  A) aesthetically more appealing,  B) easier for our users to navigate and  C) more interactive with a great forum, upcoming events and gear reviews.  We hope you all like what you are seeing!  However the technical computer stuff isn’t all we’ve been up to!  We’ve managed to have some fun outdoors too.

Sam has been teaching archery lessons at the Easton Newberry Sports Complex near Gainesville.  He made a trip down to the Florida Keys with our close buddy Dave for a week of offshore fishing.  Hell, he somehow found time to head out west to Utah to do some backcountry camping.  All while keeping the Facebook page fresh and up to date!

Josh found himself a new job working with an outdoor industry manufacturer.  He has been traveling a ton, hitting up many trade shows like the Southern Trophy Hunters Big Buck Expo and the ATA show.  He’s even been to Montrose, Colorado to meet up with Derek Ballew to do some  preseason scouting for our elk trip coming up next month.  With all of his travels, he still has been the power house behind all things website related.

Adam has spent much of his summer editing footage from last year and growing out the manliest of manly beards in preparation for his shot at redemption for a Colorado elk.  As well as help me take down some nuisance porkers that we were asked to help eradicate.  He most recently just returned from the Heartland Bowhunter film school, where he spent time learning from the best in the outdoor industry.  The big fella also has a chance this year to tag his first Iowa buck as he will meet up with Kip and Josh from Red Arrow.  As you can imagine he is pretty pumped for two awesome back to back trips!

I have been fairly busy myself trying to plan out all of our trips this season.  Besides the normal summer chores like keeping feeders full of corn and changing trail camera batteries, I have found time to build a couple of new feeders with a bit of a twist to make things easier (look forward to seeing a blog post about how I built it next!).

With so much going on within our team it’s hard to expect anything short of a season for the books!  We really hope you all like what you are seeing.  We can’t wait to get this season started off right with some backyard alligator success!  Y’all stay tuned, because we’re going places!

Brock | TSD Field Staff

Read Full Post »

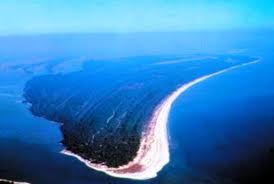
The stars have aligned!  The crew of Southern Draw has all drawn tags to hunt Sambar Deer on St. Vincent National Wildlife Refuge.  For those of you who are not familiar with Sambar deer or St. Vincent National Wildlife Refuge for that matter, than let me explain….St. Vincent is a barrier island off the northwest Gulf coast of Florida.  It is a 12,300 acre National Wildlife Refuge that many species of wildlife call home.  You see, before St. Vincent was a wildlife refuge it was a privately owned island.  The early owners were quite the recreational sportsman and introduced exotic wildlife to the island.  One very unique species introduced, which still thrives on the Island today, is the Sambar Deer. 

Sambar deer are native to Southeast Asia.  They are much larger that than the typical whitetail deer but smaller than elk or moose.  Adults can range anywhere from 200 to 700 lbs.  Their antlers are similar in structure to elk antlers, extending high above their heads.  The Sambar prefers the marsh and wetland areas of the island, making it a perfect environment for them to thrive.

Once a year, the Florida Wildlife Commission (FWC) has a special opportunity drawing where hunters get a chance to apply for a Sambar Deer tag using a lottery system.  These tags are issued to keep the Sambar population in check.  This year we applied as a group and our number was pulled!!!  That means all five team members are getting tags for this hunt!  Load up the boat; we are heading to St. Vincent for a rugged, three day, primitive weapon adventure.  That’s right, I said “BOAT”!  How else would you get to an Island?

This will be quiet the adventure and we are planning to capture the whole trip on film.  This is not a guided trip either, so don’t get confused.  We arrive on the island and set up our primitive camp the day before the hunt starts.  There is no running water, no electricity and nowhere to moor a yacht.  As if any of us have one to begin with.  We are loading up a couple of bay boats with all of our hunting gear, camera equipment, bicycles and plenty of thermacell butane canisters and pads.  That wasn’t a typo, we are taking bikes.  All the research, and forum posts, I have laid my eyes on say that bikes are a must on this hunt, especially when you are trying to get as far away from the other hunters as possible.  Basically we are traveling as light as we all can.  My gear setup will look very similar to my backcountry elk preparations, with the exception of the bike.  Who knows the bike might frustrate me and spend its day on the boat.  Wouldn’t be the first time I walked 15 miles in efforts to arrow an elk.

All in all the Southern Draw crew is excited, especially as early December draws closer.  Regardless of the outcome, the whole experience will be an adventure nonetheless.  If any of our readers have some knowledge or have ever participated in this hunt, than feel free to shoot us a line with any advice you might like to share.  Be sure to stay tuned as this hunt approaches, especially when we storm the beaches of St. Vincent.  We will be sure to bring you play by play details as events happen.

Go shoot your bows!

Adam, SD Pro Staff

Read Full Post »

After a couple of month hiatus, the blog is back online.   While we were working hard to transfer TeamSouthernDraw.com to its new and improved format we subsequently shut the Southern Draw Field Journal down.  To say the least we are just good ol’ country boys that have enough computer skills to be dangerous.  Between hanging stands, planting food plots, and checking trail cams we haven’t made the time to fix the problems.  So naturally getting the blog back online took longer than expected.  We are up and running now and we  apologize to any of our followers for the inconvenience. 

Check back each week for details from the Southern Draw Field Journal as we prepare to start the 2012 hunting season.  Be sure to add your email address to the “follow” tab found at the bottom left of the blog home page.  This way you will be notified of all field journal entries as they are published.  You never know when one of our experiences could help you in the field.  Be sure to check out our newly added Facebook page as well, come by and give us a “Like”.  This will give you the most up to date/real time information about the Team in the field.  Hopefully everyone has been shooting their bows.  The Florida archery season starts in just 12 short days. 

Shoot more, happy hunting!

Adam, SD Pro Staff

Read Full Post »

Not to rip off PJ’s latest topic but he is right, the off season is just as important as opening day. The fact of the matter is the more effort you put in, the more successful you will be. Whether this means planting new food plots, moving stands, or mowing trails, there is always something that can be improved.

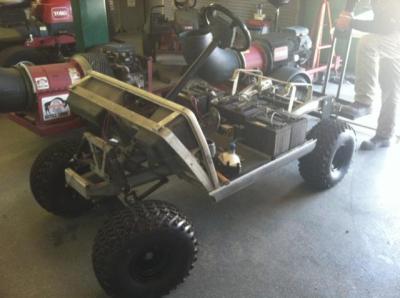
This off-season I took on a new project. None of us at Southern Draw have ever really been big fans of driving our trucks or ATVs around during deer season. Now don’t get me wrong, in the summertime it is necessary to use these gas hogs. In my eyes stealth is key…you don’t want the game to be aware of your presence. One way to accomplish this without having to hike miles from the front gate to the stand is with electric vehicles. Now of course if your financial situation allows, you could run down to your local Bass Pro Shops and pick up a Bad Boy Buggie. But if you are anything like me and always feel strapped for cash there is a cheaper way. GOLF CARTS!


It doesn’t have to be anything fancy or new. I picked this one up for free; the owner was going to just simply throw it away because he could not afford new batteries. I often come across them on Craigslist where a widow is trying to get rid of her husband’s old hobbies for a few hundred bucks. They make GREAT hunting vehicles because they are small, lightweight and can haul quite a bit surprisingly. All together we have roughly $1,000 into this cart which includes: brand new batteries ($425), 8” Buggies Unlimited lift kit ($225), and tires and wheels ($350). Although these accessories aren’t necessary, they are aesthetically pleasing. Not to mention easy to install. Anyone who has ever changed their own oil and owns a basic socket and wrench set can easily conquer this lift installation in a weekend.


All in all I would take my $1,000 ’96 Club Car over a $12,000 Bad Boy Buggie any day! Being a golf course mechanic by trade, if anyone has any questions about what to order or help with any install, please contact me at brock@teamsoutherndraw.com and I would be glad to assist in any way I can!

Brock – SD Pro Staff

Read Full Post »

I don’t know about you, but I’m tired of having to rely on other people when it comes to tinkering with my bow. What if I want to change my own draw string? What if I simply want to adjust my peep sight? Those tasks mean a drive to the local archery shop is in my very near future. Wouldn’t it be great if I had a bow press of my own….?

Christmas was just around the corner, and every year my brother Adam and I love to get each other cool hunting gifts. So, I’m in the gym on a normal Monday trying to think of something rugged that I could get him, and it hit me, “I’m going to buy him a bow press”! Wait, better yet, “I am going to build him one”! Yep, that is exactly what I am going to do.

So my vision began with a get together with my buddy John, who is an excellent welder and an even better artist, to talk about my idea. As I’m blowing him up with this vision I noticed that he too was starting to get excited. Our shared enthusiasm was awesome, especially since we both had never done anything like this before. Excitement turned into brainstorming. We began throwing around ideas, doing research on Archery Talk and using Google images like a road map. The next thing I know, I’m ordering square metal tubing, an acme rod and a bunch of other materials to bring this vision to life.

Welding the tubing together to make the frame.

Acme rod used to generate the pressing action.

First we had to fabricate the frame. This part was a piece of cake. We used 2 inch square tubing for the majority of the frame and 1 3\4 inch square tubing for the pressing arm. To create the pressing action, we ran a ¾ inch acme rod through the center of the tubing which threaded into a ¾ inch matching acme nut that was welded 3 inches the pressing arm. It was extremely critical that the nut was perfectly aligned with the acme rod to prevent any binding that may occur while the press opened and closed. This part of the build consisted of a little, “trial and error”, which definitely added some stress.

Acme nut, welded in place….not a whole lot of room to work in there.

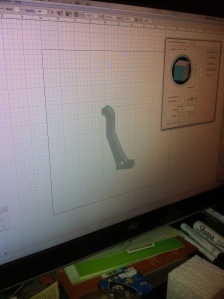
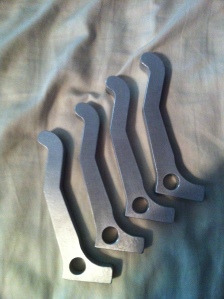
The next step in the construction, and in my opinion, one of the most interesting, was using Adobe Illustrator to design the press’s fingers. The fingers are the portion of the press that would be used to hold the bow in place. Once the design was finished we then transferred the file to a flash drive and took it to a local machine shop. There they cut the fingers out of ½ inch aluminum on a water jet. It was amazing to see how we were able to transform my design on paper, into actual parts.

Adobe Illustrator

Fingers I designed to hold the bow in place…..water jet cut out of aluminum.

After close to a month’s time and 40 hours of fabrication, things were finally coming together and the masterpiece was nearly complete. It took a little bit longer than expected due to all of the trial and error, and it probably didn’t help that I wouldn’t give the “ok”, to a piece that wasn’t perfect. John repeatedly joked about how much of a perfectionist I was the entire time, this coming from a man who gets paid for his extreme attention to detail. What’s that say about me? Ha-ha.

The Finished Product!! Success!

I feel like a gained so much knowledge from this little garage project. I encourage anyone interested in building their own press to do it! If anyone has any questions, I would be happy to provide a materials list as well as a few recommendations.

By the way, my brother Adam loved it. He was totally speachless!

Sam, SD Pro Staff

Read Full Post »

It’s late June and there’s not a lot of hunting going on right now. There is still plenty to do to prime your property for the upcoming season. For those of you that lease hunting land, this is a perfect time of the year to reacquaint yourself with your land owners. Get on the phone with them, let them know how things are going and see if there is anything you can do for them. This could be the difference in them keeping you on their tract for another year or replacing you. I have done this for almost three years now and every year another piece of property seems to open up. It’s always good to have the land owner’s good graces.

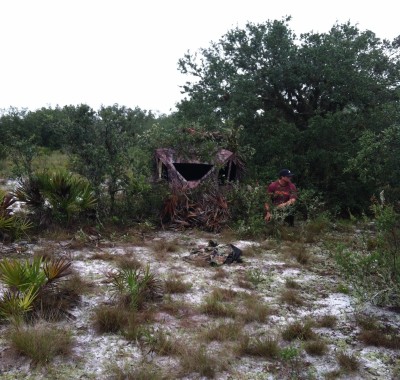
There have been some good bucks crossing our property this summer; however it seems like they spook/disappear for a few days with even the slightest bit of human activity. Mid-summer is a great time to go ahead and get your hunting areas set up in order to let the place get plenty of rest before the season. With your ground blinds, try your best to brush them in with their natural surroundings. I constantly see people just plop down these camo boxes in the wide open, and expect them to work. In my opinion, it just doesn’t look natural; take the extra time to really make your set up blend in.

Tropical storm Debbie afforded us some time off work early this week, so we put our rain gear on and got some of these chores done. In 2 days, we planted 8 acres of dove fields, got a few stands hung, brushed in a blind, and even had time to clean up the small pond we have on property. If you want to increase your odds this season, put the leg work in, do some scouting, and get your property primed. Reap the rewards of your efforts, I’m planning too!

Now all that’s left is to fine tune the ole bow and try to drag myself through this hot summer until hunting season!

PJ, SD ProStaff

Read Full Post »

Older Posts »